Set Variable

Fields
- Variables (required): Add one or more variable–value pairs. For each pair, pick the workflow variable to set and the value (you can use workflow variables, contact fields, and attributes via the dropdown or by typing placeholders).
Use cases
- Store the contact’s reply for later: After a trigger or message action that has “Save text reply to” or “Save file reply to”, use Set Variable to copy that value into a named variable so you can reference it in a Condition, AI action, or the next message.
- Prepare values after an API call: After an API action, use Set Variable to map response fields (via the API’s response mapping) into workflow variables, then use those variables in conditions or message templates.
- Build a value for templates or attributes: Combine workflow variables, contact fields, and fixed text into one variable, then use it in a message body or in Set Attribute so the contact or your CRM sees the formatted value.
Clear Variable

Fields
- Variables (required): Select the workflow variables to clear. You can select multiple.
Use cases
- Reset before asking again: Before a message action that asks a question and saves the reply to a variable, use Clear Variable on that variable so you don’t reuse an old answer from a previous run or step.
- Clean up after a branch: When different branches set the same variable, clear it at the start of a shared path so the rest of the automation doesn’t use a value from the wrong branch.
- Free up variables you no longer need: Clear one or more variables in one action when the automation no longer needs them, so you avoid leaking stale data into later steps or attributes.
Condition
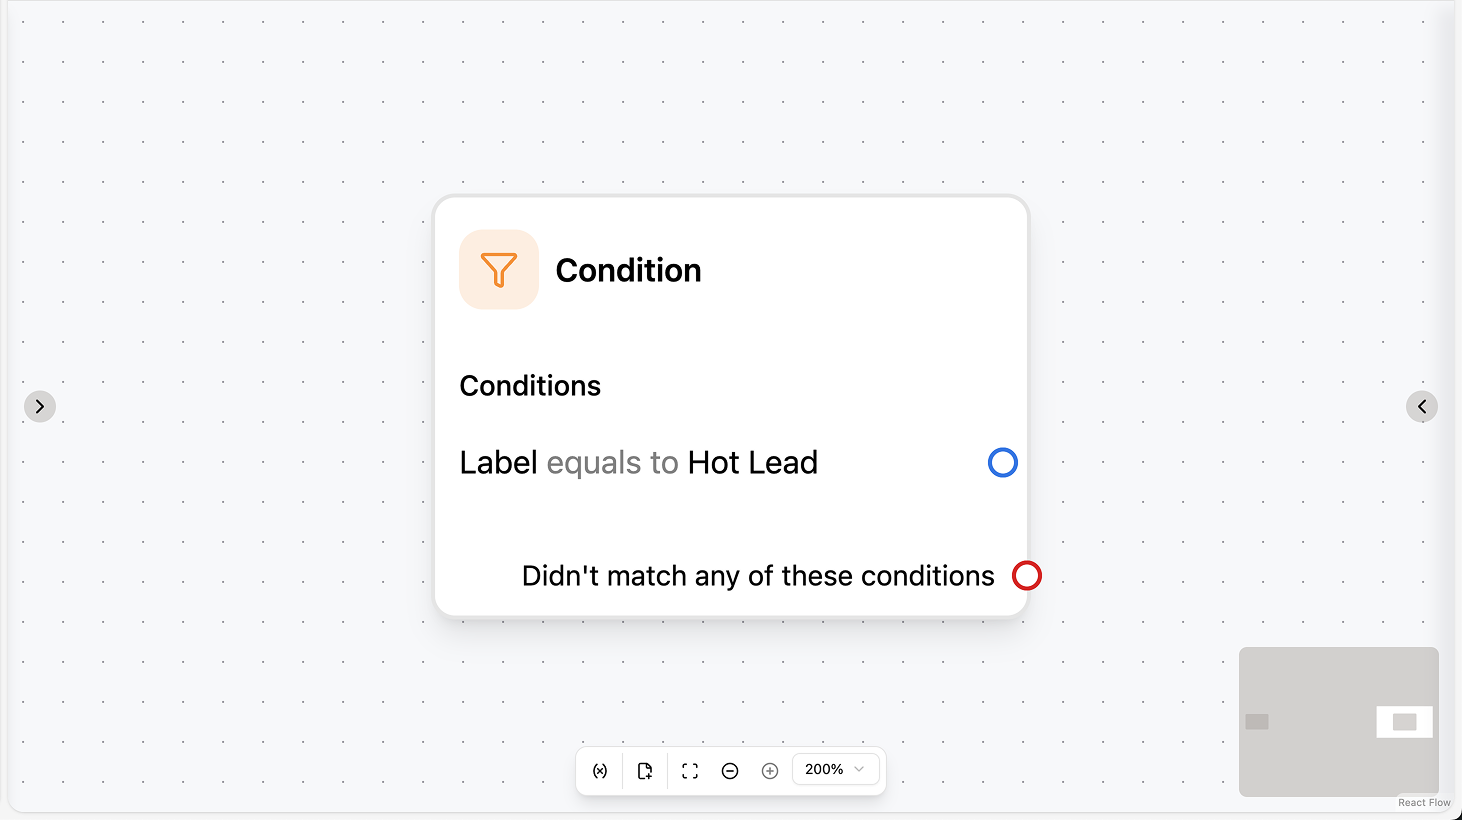
Fields
- Condition groups (required): Add one or more groups (up to 10). Each group has a logical operator (AND or OR) and a list of conditions. Each condition compares a left operand (variable, attribute, contact field, etc.) to a right value using an operator (equals, contains, etc.). The first group that evaluates to true determines which branch runs.
Use cases
- Route by intent or attribute: After AI Intention Recognition or “Save text reply to”, add a Condition that checks the variable or attribute (e.g. “intention equals support”); use different branches to Assign chat, Move chat, or send different messages per branch.
- Branch on contact data: Use conditions on contact fields or attributes (e.g. “language equals Spanish”, “segment equals VIP”) to send localized messages, assign to the right team, or add to different campaigns.
- Keyword or content checks: Use a condition on the saved message (e.g. “body contains refund”) to branch to a dedicated flow (e.g. refund path vs. general support); order groups from most specific to least specific so the right branch runs first.
Start Other Automation

Fields
- Workflow (required): Select the automation to start. Only workflows with a “Manual trigger” appear.
- Variables mapping (optional): Map variables from the current workflow to the target workflow’s parameters. For each target parameter, set the value (e.g. a workflow variable, contact field, or attribute) that the started workflow will receive.
Use cases
- Reuse a common sub-flow: Build one workflow (e.g. send survey, add to campaign, run a checklist) with a Manual trigger, then start it from multiple automations via Start Other Automation; use variable mapping to pass in context (e.g. reason, source).
- Chain automations: After one automation has done its job (e.g. qualified the lead), use Start Other Automation to run another workflow (e.g. add to campaign, notify sales) and pass variables so the second workflow has the data it needs.
- Same flow from different entry points: Trigger the same “sub” workflow from a campaign, from the Inbox, or from different parent automations; mapping ensures the sub-flow receives the right parameters (e.g. campaign ID, contact attribute) no matter who started it.
Delay

Fields
- Type (required): Choose “Fixed” for a single duration or “Random” for a range.
- Delay (required): The duration to wait (e.g. 5 minutes). For random, this is the minimum.
- Max delay (required if type is “Random”): The maximum duration (e.g. 10 minutes). The actual delay is between the minimum and this value.
- Continue time limit (optional): When enabled, the automation continues only during the specified days and time window (e.g. weekdays 9:00–17:00). Outside that window, the delay effectively pauses until the next allowed time.
Use cases
- Follow-up after a delay: After a trigger (e.g. Chat closed) or another action, add a Delay (e.g. 2 hours) so the next step (e.g. Send message, Add to campaign) runs later; use “Continue time limit” so it only runs during business hours.
- Stagger actions: Use a random delay (e.g. 1–5 minutes) so many automations don’t fire at the same second (e.g. after a campaign or bulk trigger), reducing spikes and making flows feel more natural.
- Reminder or re-engagement: Delay for a set period (e.g. 24 hours), then send a message or add the contact to a campaign if they haven’t replied; combine with conditions or Clear variable so you only act when appropriate.
Randomizer

Fields
- Paths (required): Add one or more paths (up to 6). For each path, set a percentage (0–100). The sum of all percentages must equal 100.
Use cases
- A/B test two flows: Use two paths (e.g. 50% / 50%) to send contacts down different message or assignment flows and compare outcomes (e.g. different welcome messages or AI vs. human first).
- Weighted routing: Use the randomizer to split traffic by percentage (e.g. 80% path A, 20% path B) so most contacts get the standard flow and a smaller group gets a premium or experimental flow.
- Load balance across options: When you have several valid paths (e.g. multiple teams or message variants), use the randomizer to distribute contacts across them by percentage so no single path is overloaded.